Overview of Pix4D
What is the overlap needed for Pix4D to process imagery?The amount of overlap needed to process imagery properly depends on the type of terrain mapped, and will determine the rate at which images are taken. In general, the more overlap the better. As a rule of thumb, the recommend amount of overlap is at least 75 percent frontal overlap and 60 percent side overlap.
What if the user is flying over sand/snow, or uniform fields?
In the special cases where you are processing data of sand and/or snow, or even flat terrain and agricultural fields, Pix4D recommends at least 85 percent frontal overlap and 70 percent side overlap.
What is Rapid Check?
Rapid/Low Res check is a Processing Template that produces fast results at a low resolution, working as an in-field indicator of the quality of the dataset. If the processing results are poor, the data set is also poor and the images should be recollected.
Can Pix4D process multiple flights? What does the pilot need to maintain if so?
Pix4D can process multiple flights, but the pilot must maintain enough overlap within each flight and among the flights, be collected under similar conditions (sun direction, weather conditions, etc.) and maintain a similar flight height.
Can Pix4D process oblique images? What type of data do you need if so?
Pix4D can process oblique images, in fact they are recommended for recreating buildings. It is strongly recommended to use Ground Control Points or Manual Tie Points to properly adjust the images.
Are GCPs necessary for Pix4D? When are they highly recommended?
GCPs are not necessary for Pix4D, but are highly recommended for processing oblique images or when combining aerial nadir, aerial oblique, and/or terrestrial images.
What is the quality report?
After processing data, the quality report is produced detailing how the process went. It will include a detailed quality check of the images, dataset, camera optimization, matching, and georeferencing. It generates a preview of the image, shows initial positions, computed image GCP positions, absolute camera position and orientation uncertainities, 3D points from 2D keypoint matches, geolocation details, and processing options.
Pix4D Walk Through
Getting Started
Before opening Pix4D, create a folder to work in and store all your results. I created a folder named "Pix4D" in my Q drive.
Then I opened Pix4D and clicked on "New Project". A new project window popped up prompting me to select a name for the project and file to store all generated data in. I named my project following a naming scheme that included the date the flight occurred, site location, UAS platform or sensor name, and flight altitude. I saved the project in the "Pix4D" folder I just created in my Q drive. Click next.
The next page prompted me to select images to be processed. After reviewing all images for quality, I selected all images collected that day from the Phantom and added them. It is important to review image properties for accuracy. For example, the the camera is listed as having a global shutter. The camera used to collect the data however does not have a global shutter. I manually changed that designation to "Linear Rolling Shutter." Click Next.
The next page prompted me to select the output coordinate system, which I left in default. Click Next.
For a processing Template, I selected 3D maps. Click "Finish."
On the bottom left corner of the window, I clicked "Processing" which opened a mini window at the bottom of the page. I unchecked "2. Point Cloud and Mesh" and "3. DSM, Ortho and Index" leaving only "1. Initial Processing" checked. Once initial processing is complete, I will review the Quality Report to determine if the data set is good enough to continue processing it further. The initial processing will take some time to complete.
When initial processing is complete, view the "Quality Report." If the results are good, you can completely process the data. Uncheck "1. Initial Processing" and check "2" and "3, as seen in figure 3. When this processing is complete, another "Quality Report" is produced.
As seen in figure 4, 197 out of 222 images were used. The 25 that weren't were probably the images collected over the water body which are difficult to process. Overlap around the edges are poor, because less images are collected on the edges than in the middle of the processing area.
On the left ribbon of the viewing area, I clicked "rayCloud" and checked Triangle Mesh (see Figure 5) to view the data (Figures 6-8).
The next page prompted me to select images to be processed. After reviewing all images for quality, I selected all images collected that day from the Phantom and added them. It is important to review image properties for accuracy. For example, the the camera is listed as having a global shutter. The camera used to collect the data however does not have a global shutter. I manually changed that designation to "Linear Rolling Shutter." Click Next.
The next page prompted me to select the output coordinate system, which I left in default. Click Next.
For a processing Template, I selected 3D maps. Click "Finish."
Processing Data
On the main screen, I can see basemap imagery around the location the data was collected, overlain by the data collected in the form of a red dot for each location an image was taken.To speed up processing, I drew a polygon around the actual mine, cutting out the forested area I do not care about for this project. To accomplish this, I clicked "Map View" on the upper ribbon, then "Processing Area," and finally "Draw (see figure 1)." This tool allowed me to delineate the area I wanted processed, as seen in figure 2.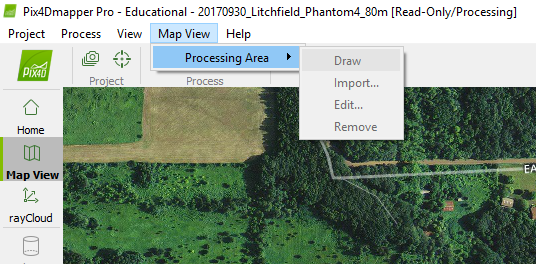 |
| Figure 1: Delineate Processing Area "Map View" > "Processing Area" > "Draw" |
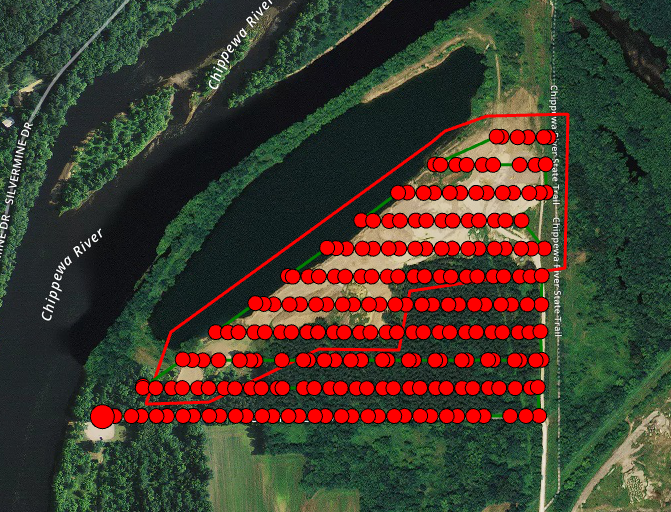 |
| Figure 2: Delineated study area. Almost half of the images are collected over a forested area that are irrelevant to the purpose of finding the volume of mine stock piles. A study area line is delineated around the mine area. Only images collected within this area will be processed. |
When initial processing is complete, view the "Quality Report." If the results are good, you can completely process the data. Uncheck "1. Initial Processing" and check "2" and "3, as seen in figure 3. When this processing is complete, another "Quality Report" is produced.
 |
| Figure 3: After Initial Processing checks out, create a point cloud mesh, DSM, Ortho, and Index. |
As seen in figure 4, 197 out of 222 images were used. The 25 that weren't were probably the images collected over the water body which are difficult to process. Overlap around the edges are poor, because less images are collected on the edges than in the middle of the processing area.
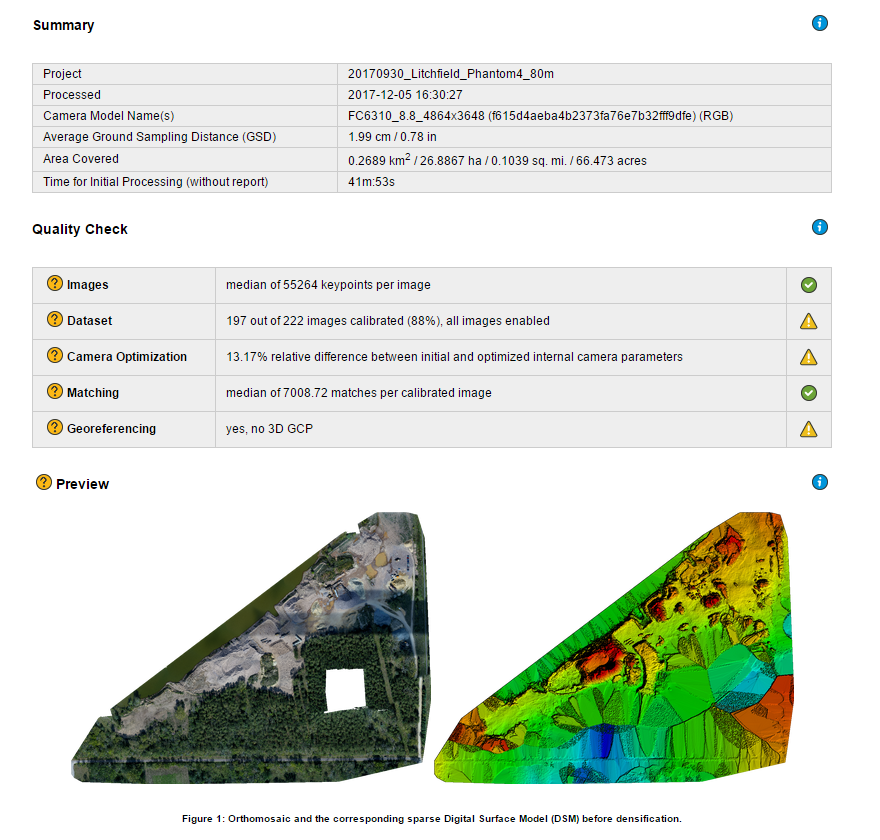 |
| Figure 4: Quality Report Summary. |
 |
| Figure 5: RayCloud |
 |
| Figure 6: Overview of data processing results. |
 |
| Figure 7: Data processing result demonstrating 3D nature. |
 |
| Figure 8: Representation of our class looks like an frame from The Walking Dead. |
Map Results
This process produces some visually stunning images, but without GCP's the data is not spatially accurate. In figure 9 I demonstrate this by drawing a red line on the east-most side of two major roads at the mine site that don't change with time. When this feature class is laid over the Phantom 4 raster file at the mine site, you can see that the roads do not line up. Figure 10 is a screenshot from Elevation Finder (input coordinates 44.77495, -91.57188) showing that the approximate elevation at the site of mine to be about 234 meters AMSL, a significant difference from the 80-100 meters AMSL elevation reported by the Digital Surface Model created without GCPs (Figure 12). Figures 11 and 12 display the Orthomosaic and Digital Surface Model created.
 |
| Figure 9: Need for Datum. Right: Spatial Accuracy file draw on basemap. Left: Spatial Accuracy Overlain Phantom 4 Raster Data demonstrating spatial inaccuracies. |
 |
| Figure 10: Elevation Finder reports average elevation at the mine site approximately 224 meters. |
 |
| Figure 11: Orthomosiac |
 |
| Figure 12: Digital Surface Model |
Final Thoughts
My overall impression of Pix4D is that the program is relatively user friendly and creates incredible products out of the data provided. In this lab that products were not very spatially accurate because no GCPs were used. In the next lab, I will process the same data using 16 GCPs which should correct inaccuracies. This data takes a lot of time to process, so I appreciated the detailed progress bar that broke up progress into 15 segments. The summary produced after processing was very helpful, but I wish that like ESRI products the summary was hyperlinked to websites that could provide more detailed information about what the results mean.


Greetings - I enjoyed your article. If someone was using Pix4D for measurements only, and an orthomosaic did not need to be spatially accurate (such as measures yaw marks, tire marks, or crime scene information) would GCPs be necessary? I don't need the map to be extremely accurate, I just need it to be accurate to itself. Sort of like tuning a guitar to itself as opposed to a tuner.
ReplyDeleteHello, thanks for checking out my blog. This was first of only two projects using Pix4D, and I have yet to explore all of its features and capabilities. This is to say that I may not be the best person to ask. However in my opinion, the more accurate the data the better, if you have the capacity to process with GCPs do it. However, when working on such a small scale the GPS instrument must be even more precise.
ReplyDelete